I. Introduction
Laser cutting is an advanced manufacturing process that utilizes a focused beam of light to cut, engrave, or etch materials with high precision. Despite its widespread adoption in industries ranging from automotive to electronics, this process is not devoid of challenges.
One of the most prevalent issues encountered is the appearance of burn marks on the finished product. These marks can not only detract from the visual appeal of a component but also compromise dimensional accuracy and surface integrity.
How to achieve laser cutting without burn marks? As the article progresses, we will delve deeper into the root causes of burn marks, and the practical methods to avoid burn marks. I hope this article will be useful to you.
II. Causes of Burn Marks in Laser Cutting
Burn marks, a frequent problem in laser cutting, can drastically reduce the quality of the final product. Understanding the primary causes of burn marks is essential for optimizing the laser cutting process and achieving clean, precise cuts.
High Laser Power
Excessive laser power is a primary cause of burn marks, as it results in too much heat being applied to the material. When the laser power exceeds what is necessary for cutting, the material overheats and burn marks appear. This issue is particularly significant for heat-sensitive materials such as thin plastics or delicate fabrics.
Key Points:
- Excessive Heat:Â High power leads to excessive heat, causing burning.
- Material Sensitivity:Â Different materials have different tolerance levels for laser power. For example, acrylic is prone to burn marks if the power is too high, whereas metals might tolerate higher power levels without burning.
Example:
Consider cutting a 2mm thick acrylic sheet. If the recommended power setting is 50W, using 70W can cause burn marks due to the excessive heat generated.
Incorrect Focal Point
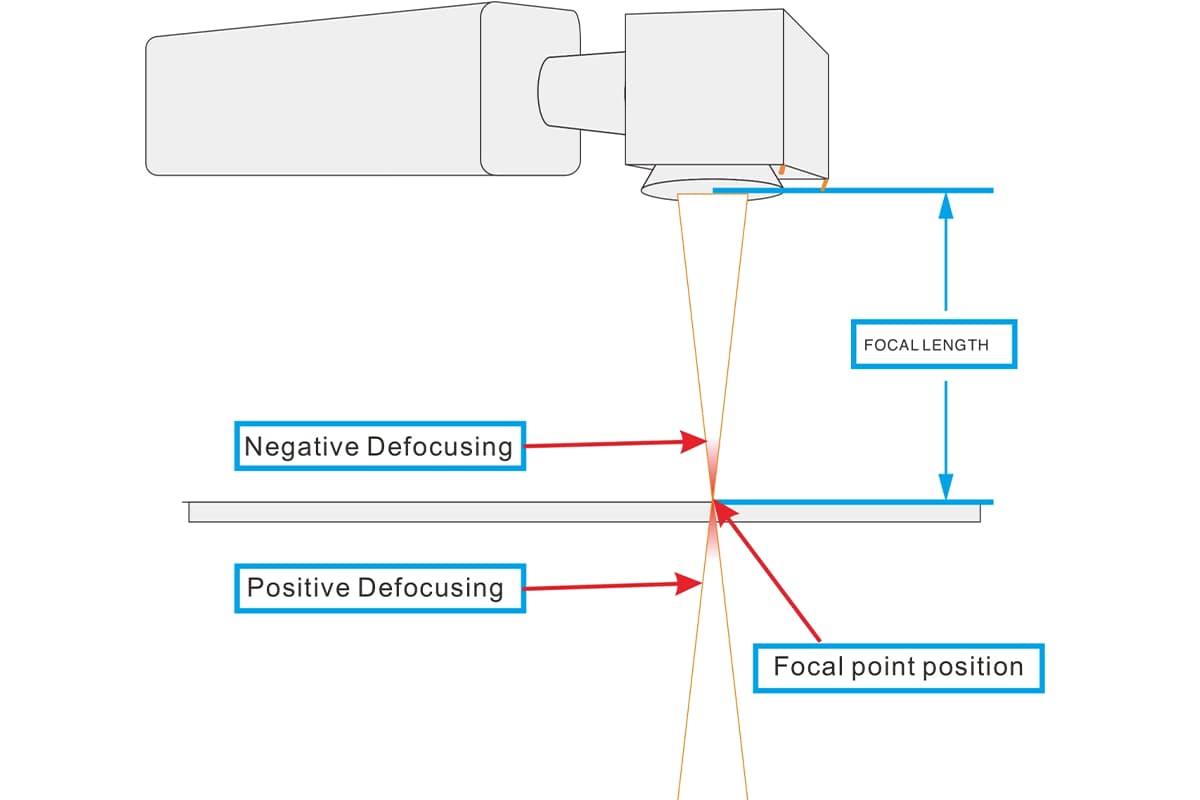
Achieving a clean cut heavily depends on the correct focus of the laser beam. An incorrect focal point can lead to inefficient cutting and burn marks. If the focal point is not properly aligned with the material's surface, the laser energy is not concentrated where it is needed, causing uneven heating and burn marks.
Key Points:
- Alignment Issues:Â Misalignment of the focal point can disperse laser energy, causing burns.
- Optimal Focus:Â Accurately setting the focal point based on material thickness and type ensures clean cuts.
Example:
When cutting a 5mm thick plywood, if the focal point is set too high or too low, the energy will not be concentrated on the cutting line, leading to burn marks and incomplete cuts.
Material Related Issues
Improper Material Settings
Optimal laser cutting requires specific settings—power, speed, and frequency—that vary with each material. Using incorrect settings can lead to burn marks. For instance, cutting at a slower speed than necessary results in prolonged exposure to the laser beam, causing overheating and burns.
Key Points:
- Speed and Power Settings:Â Incorrect settings can cause prolonged exposure and burns.
- Material Specificity:Â Different materials have unique optimal settings that need to be adhered to.
Example:
Cutting a cardboard sheet requires lower power and higher speed settings compared to cutting metal. Using metal settings on cardboard will likely result in burn marks.
Material Impurities
Material quality significantly influences the outcome of the laser-cutting process. Impurities or inconsistencies in the material, such as coatings, oxides, or embedded particles, can create irregularities in how the laser energy is absorbed and dissipated. These impurities often lead to hot spots, increasing the likelihood of burn marks. Utilizing high-purity materials and ensuring proper surface preparation can mitigate this issue.
Incorrect Material Selection
Certain materials are more susceptible to thermal damage and may not be suitable for laser cutting. For example, plastics can easily melt and burn if not cut under optimal conditions. Material selection should be guided by compatibility with laser cutting and consideration for thermal properties to prevent burn marks.
Insufficient Air Assist

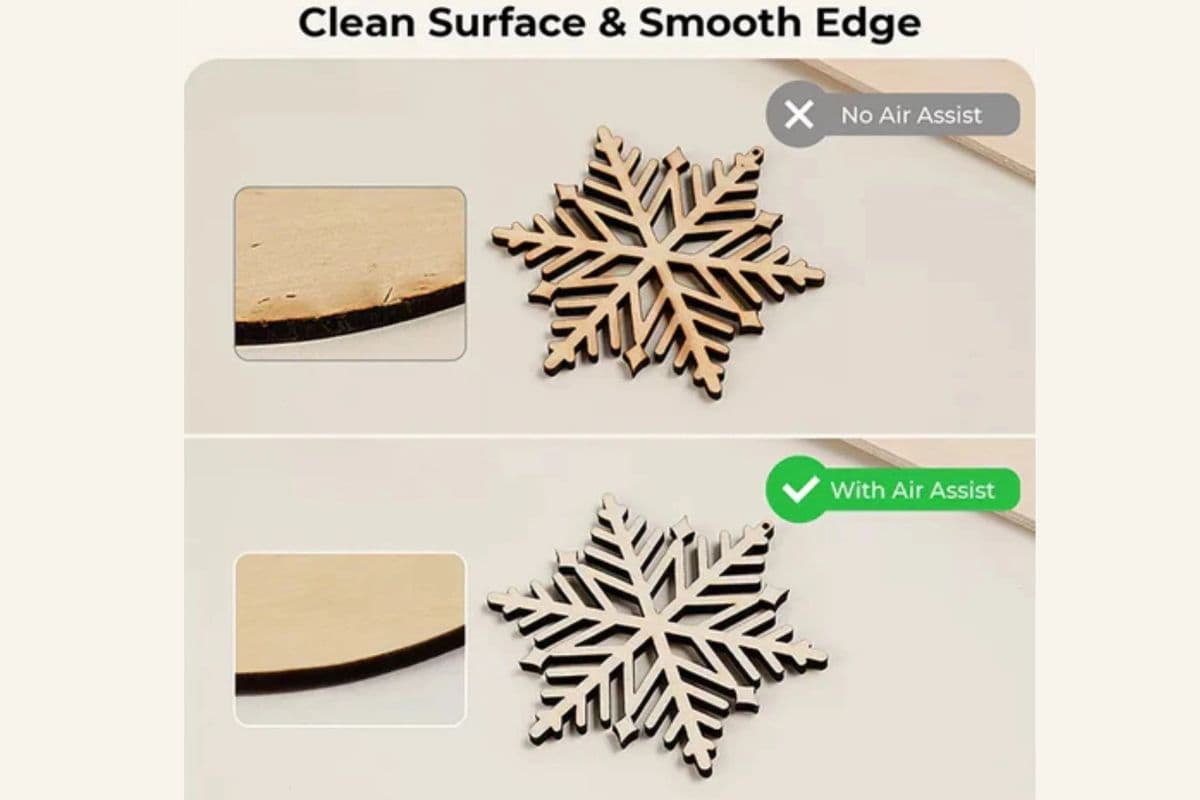
Air assist involves using a gas stream (like oxygen, nitrogen, or compressed air) to remove molten material and debris from the cutting area. Insufficient air assist can lead to burn marks by allowing molten material to accumulate and burn the surface.
Key Points:
- Debris Accumulation:Â Lack of proper air assist can cause debris buildup, leading to burns.
- Gas Type:Â The type of gas used in air assist can also impact the likelihood of burn marks. For example, nitrogen is often preferred for cutting materials like stainless steel to prevent oxidation.
Example:
While cutting metal, using compressed air instead of nitrogen might lead to oxidation and burn marks on the cut edges.
Suboptimal Beam Quality
The quality of the laser beam itself can affect cutting performance. Beam quality refers to the focusability of the laser beam, which impacts the efficiency and precision of the cutting process. A laser with poor beam quality will not focus the energy effectively on the material, resulting in uneven cutting and burn marks. Investing in lasers with superior beam quality can significantly reduce the occurrence of burn marks.
Inefficient Cooling Systems
During the cutting process, both the laser and the material can generate significant amounts of heat. Inefficient cooling systems in the laser cutter can lead to thermal buildup, which in turn can cause burn marks on the material. Implementing adequate cooling mechanisms, such as water or air cooling, helps to dissipate heat away from the cutting zone, maintaining the integrity of the cut edges.
Smoke and Debris Accumulation
During the laser cutting process, smoke and debris are produced as the material vaporizes. If not properly evacuated, these byproducts can settle on the material surface, causing burn marks and staining.
Types of Burn Marks
Edge Burn
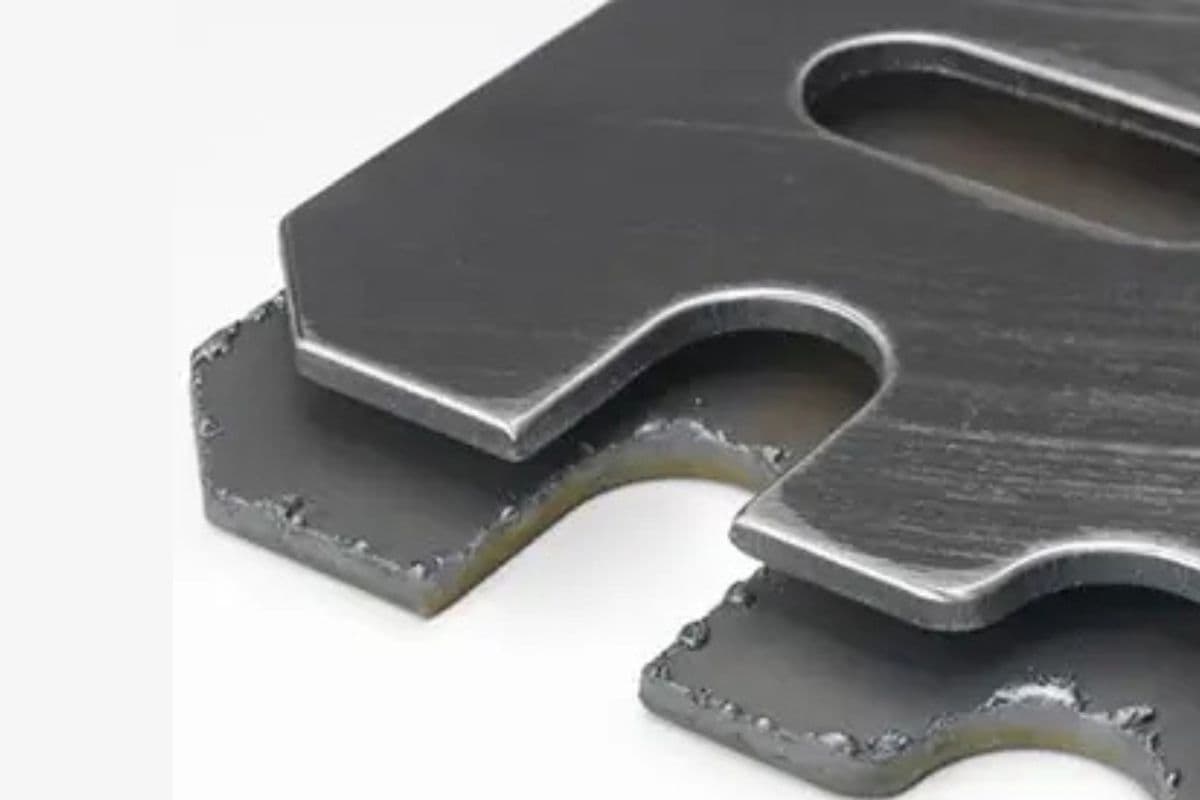
Edge burn appears as discoloration or charring along the cut edges, resulting from direct contact with the laser beam. On wood, this manifests as brown or black edges, while on plastics, it results in a melted or glossy appearance.
Flashback
Flashback occurs when the laser beam comes into contact with the cutting bed, causing heat to reflect onto the underside of the material. This is particularly noticeable on thicker materials and those that are more combustible.
Surface Discoloration
Surface discoloration can occur due to heat transfer or smoke particles settling on the material. This can result in yellowing or scorching of the surface, especially on wood.
III. Techniques to Prevent Burn Marks
Achieving laser cutting without burn marks involves a combination of adjusting machine settings, carefully selecting materials, and employing the correct techniques.
Adjusting Laser Power
One of the most effective ways to prevent burn marks is by adjusting the laser power to match the material being cut. Using the appropriate power level ensures that the material is cut efficiently without excessive heating.
Key Points:
- Material-Specific Power Settings: Each material has an optimal power setting that needs to be identified and used.
- Gradual Adjustments: Make incremental changes to the power settings to find the sweet spot that cuts effectively without burning.
Example:
When cutting a delicate material like thin fabric, starting with a lower power setting and gradually increasing it can help achieve a clean cut without burn marks.
Optimizing Focal Point

The focal point of the laser beam must be precisely aligned with the material's surface. Correct focal point alignment ensures that the laser energy is concentrated where it is most effective, reducing the chances of burn marks.
Key Points:
- Focus Calibration: Regularly calibrate the laser cutter to ensure the focal point is correctly set.
- Material Thickness: Adjust the focal point based on the material's thickness to maintain optimal cutting efficiency.
Example:
Cutting a 3mm thick acrylic sheet requires setting the focal point at the material's surface for precise energy concentration and clean cuts.
Material-Specific Settings
Different materials require specific settings for power, speed, and frequency. Using the correct settings for each material can significantly reduce the risk of burn marks.
Key Points:
- Speed Adjustments: Faster cutting speeds can minimize the exposure time, preventing overheating and burns.
- Frequency Modulation: Adjusting the frequency settings based on the material can enhance cutting quality and reduce burn marks.
Example:
For cutting plywood, using a higher speed and adjusting the frequency to match the material's characteristics can prevent burn marks and achieve a smooth cut.
Pre-Treatment Methods
Pre-treating materials before cutting can also help prevent burn marks. Common methods include applying masking tape to the surface of the material to protect it from direct laser exposure.
Key Points:
- Masking Tape: Applying masking tape to wood or other materials can prevent scorch marks by absorbing excess heat.
- Surface Coatings: Special coatings or sprays can be used on certain materials to protect against burns.
Example:
Applying masking tape to a wooden surface before laser cutting can protect the wood from burn marks, resulting in a cleaner finish.
Enhancing Air Flow and Assist Gas
Air assist, which involves directing a stream of gas at the cutting area, helps remove molten material and debris, preventing burn marks. The type and pressure of the assist gas play crucial roles in achieving clean cuts.
Key Points:
- Gas Selection: Choose the appropriate gas (e.g., nitrogen, oxygen, or compressed air) based on the material being cut.
- Pressure Optimization: Adjust the gas pressure to ensure efficient removal of debris and cooling of the cutting area.
Detailed Example:
Using nitrogen as an assist gas while cutting stainless steel can prevent oxidation and burn marks on the cut edges, resulting in a cleaner finish. For instance, a study showed that using nitrogen at 10 psi reduced burn marks by 30% compared to using compressed air at the same pressure.
Advanced Tips and Innovations
Incorporating advanced techniques and staying updated with the latest innovations in laser cutting technology can further enhance cutting quality and prevent burn marks.
Key Points:
- Beam Shaping: Utilizing advanced beam shaping techniques can provide more uniform energy distribution, reducing the risk of burns.
- Modern Software: Leveraging cutting-edge software that optimizes cutting paths and parameters can lead to cleaner cuts and fewer burn marks.
Example:
Recent innovations in beam shaping technology have shown significant improvements in cutting quality by creating a more uniform energy distribution, which helps minimize burn marks.
Implementing Effective Cooling Strategies
Incorporating robust cooling systems can reduce the thermal impact on both the laser and the material. Water or air cooling mechanisms help to dissipate heat generated during cutting, thereby preventing overheating and burn marks. Implementing zoned cooling areas, where specific sections are cooled more intensively, can be particularly effective for materials prone to thermal damage.
Regularly Updating Process Parameters
As materials and laser technologies evolve, regularly updating process parameters based on the latest research and industry best practices is crucial. Keeping abreast of advancements in laser technology, materials, and cooling systems allows for continuous improvement in the cutting process. Conducting periodic reviews and adjustments to the cutting parameters ensures that the process remains optimized for preventing burn marks.
Implementation of Pulse Cutting

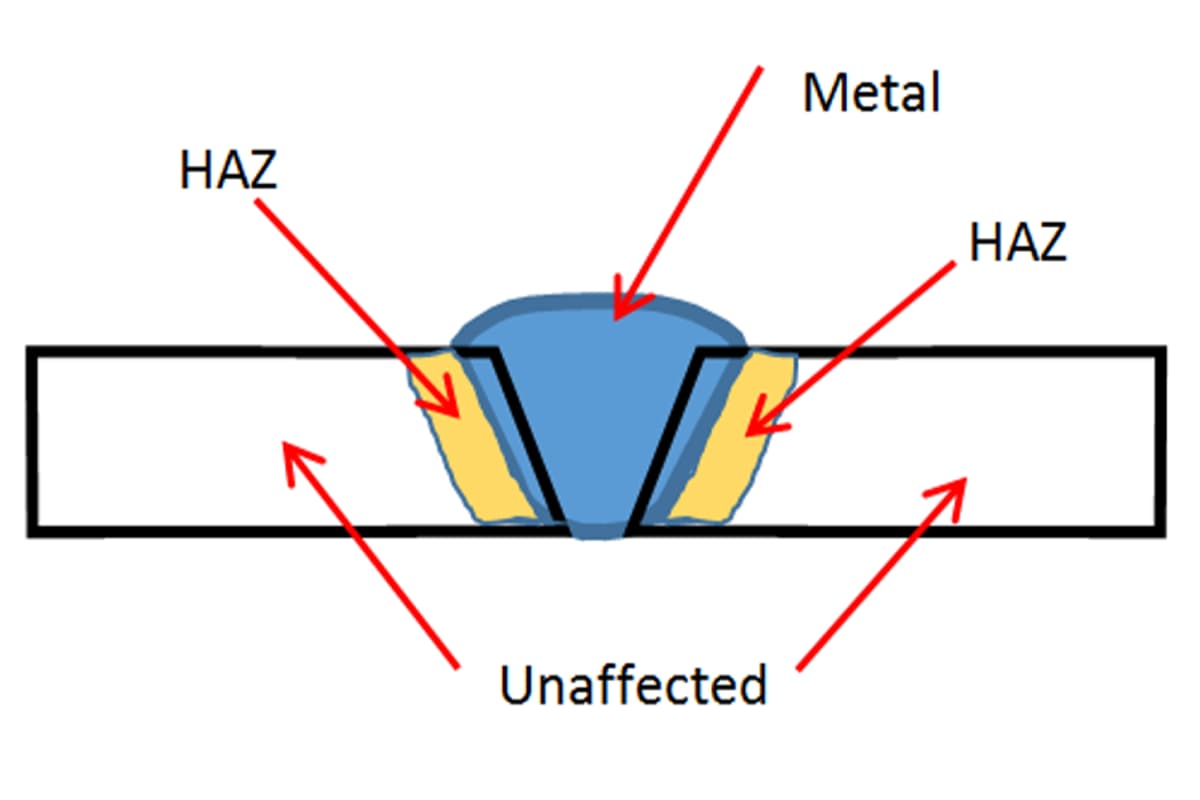
For certain applications, utilizing pulse cutting rather than continuous wave cutting can be beneficial. Pulsing the laser delivers energy in short bursts, allowing the material to cool slightly between pulses. This technique can reduce the overall heat affected zone (HAZ) and minimize the risk of burn marks. Fine-tuning the pulse duration and frequency to match the material properties is essential for effective pulse cutting.
IV. Choosing the Right Materials
Selecting the appropriate materials is crucial for achieving high-quality laser cuts without burn marks. Different materials respond uniquely to laser cutting processes, and understanding these characteristics can help prevent common issues such as burn marks.
Types of Materials Suitable for Laser Cutting
Laser cutting can be applied to a diverse range of materials, each with its specific properties and requirements. Here are some common materials used in laser cutting, along with their potential applications:
Metals
- Steel:
- Types:Â Carbon steel and stainless steel.
- Applications:Â Automotive parts, architectural elements, and industrial machinery.
- Considerations:Â Stainless steel benefits from nitrogen assist gas to prevent oxidation and burn marks.
- Aluminum:
- Applications:Â Aerospace components, electronics enclosures, and signage.
- Considerations:Â Requires careful settings to avoid burn marks, especially when cutting thin sheets.
- Copper and Brass:
- Applications:Â Electrical components, decorative items, and plumbing fixtures.
- Considerations:Â Highly reflective and conductive, necessitating specialized laser systems and settings.
Non-Metals
- Plastics:
- Types:Â Acrylic, polycarbonate, and other plastics.
- Applications:Â Display cases, signage, and medical devices.
- Considerations:Â Acrylic produces clean, polished edges, while polycarbonate may need different settings to avoid burns.
- Wood:
- Types:Â Plywood, MDF, and hardwoods.
- Applications:Â Furniture, decorative panels, and model making.
- Considerations:Â Proper power and speed settings are essential to prevent burn marks, especially on thin or delicate wood types.
- Textiles:
- Types:Â Fabrics and leather.
- Applications:Â Fashion, upholstery, and accessories.
- Considerations:Â Lower power settings and faster speeds are typically used to avoid burn marks.
Composites and Specialty Materials
- Composites:
- Types:Â Fiberglass and carbon fiber composites.
- Applications:Â Automotive parts, sporting goods, and aerospace components.
- Considerations:Â Require precise settings to avoid burns and delamination.
- Rubber and Foam:
- Applications:Â Gaskets, packaging, and custom inserts.
- Considerations:Â Care must be taken to prevent melting and burn marks.
Material Thickness Considerations
The thickness of the material being cut plays a significant role in determining the appropriate laser settings and preventing burn marks. Thicker materials require higher power settings and slower speeds, which can increase the risk of burn marks if not properly managed.
Key Points:
- Thin Materials:
- Considerations:Â Require lower power and higher speed to avoid excessive heat buildup and burn marks.
- Thick Materials:
- Considerations:Â Need higher power and slower speeds for effective cutting but require careful balance to prevent burns. Assist gases like nitrogen can help in cooling and debris removal.
Example:
- Thin Stainless Steel (1mm):Â May require 50W of power and a high cutting speed.
- Thick Stainless Steel (10mm):Â Might need 500W and a slower speed to achieve a clean cut without burn marks.
Surface Coatings and Their Impact
Surface coatings on materials can significantly affect laser cutting outcomes. Coatings can either protect the material surface or interfere with the cutting process, leading to burn marks if not properly managed.
Protective Coatings:
- Anodized Aluminum:Â Acts as a protective layer, reducing the risk of burn marks and providing a clean finish.
- Masking Films:Â Applying protective films or tapes to materials like wood and plastics can prevent surface burns and scorch marks.
Problematic Coatings:
- Reflective Coatings:Â Highly reflective surfaces, such as polished metals, can reflect the laser beam, causing inefficiencies and potential burn marks.
- Paints and Varnishes:Â Pre-painted or varnished surfaces can burn or discolor during cutting, necessitating adjustments in laser settings or pre-treatment techniques.
Example:
- Anodized Aluminum:Â Cutting with a protective coating results in a clean edge without burn marks.
- Varnished Wooden Panel:Â May require masking tape to prevent surface burns.

V. Frequently Asked Questions
1. How does air assist help in reducing burn marks?
Building on the previous point about material settings, air assist involves directing a stream of gas (such as nitrogen, oxygen, or compressed air) at the cutting area. This helps in several ways:
- Debris Removal:Â It blows away molten material and debris, preventing them from accumulating and causing burn marks.
- Cooling:Â The gas cools the material, reducing the risk of overheating and burns.
- Oxidation Prevention:Â Using inert gases like nitrogen can prevent oxidation and discoloration on the cut edges.
2. Are there specific laser cutting machines designed to avoid burn marks?
Yes, modern laser cutting machines come with advanced features designed to minimize burn marks:
- Fiber Lasers:Â Highly efficient and precise, suitable for cutting metals with minimal risk of burn marks.
- CO2 Lasers:Â Ideal for non-metals like wood and acrylic, offering clean cuts with proper settings.
- Dynamic Beam Shaping:Â Technology that adjusts the beam profile in real-time, ensuring uniform energy distribution and reducing burn marks.
- Real-Time Monitoring Systems:Â These systems adjust cutting parameters on-the-fly based on sensor feedback, preventing burn marks.
3. What maintenance practices are essential for preventing burn marks?
Regular maintenance of laser cutting equipment is crucial:
- Optic Cleaning:Â Keep lenses and mirrors clean to ensure the laser beam is unobstructed.
- Cooling System Maintenance:Â Ensure the cooling system is functioning correctly to prevent overheating.
- Alignment Checks:Â Regularly check and adjust the alignment of the laser beam.
- Component Replacement:Â Replace worn-out components like nozzles and lenses promptly.
4. Can post-cut treatments remove burn marks?
Yes, several post-cut treatments can help remove or reduce the appearance of burn marks:
- Mechanical Polishing:Â Use polishing tools to smooth and clean the cut edges.
- Chemical Treatments:Â Apply solvents or cleaning agents to remove discoloration and burn marks from the material surface.
- Sanding:Â Lightly sanding the edges can remove burns from materials like wood and acrylic.
5. How do different laser technologies compare in terms of burn mark prevention?
Different laser technologies offer various advantages in preventing burn marks:
- Fiber Lasers:Â Excellent for cutting metals with minimal risk of burn marks due to their high precision and efficiency.
- CO2 Lasers:Â Suitable for non-metals, offering clean cuts with correct settings and maintenance.
- Nd:YAG/Nd:YVO4 Lasers:Â Provide high precision for cutting metals and some ceramics, useful for applications requiring fine details.
Mechanical Seal And Nozzle,Carbide Garden Hose Nozzle,Tungsten Carbide Hose Nozzle,Carbide Hose Nozzles
Zigong Brace Cemented Carbide Co.,Ltd , https://www.bracecarbide.com